HTTPS for Your EC2 Web Server
Published on December 1, 2021
By Hyuntaek Park
Senior full-stack engineer at Twigfarm
Introduction
Sometimes you need a simple web server for various reasons. Handling webhook callbacks, hosting a pilot frontend website, and making a bot service are a few examples of simple web servers.
With AWS EC2 and Route 53, you can create a web server with your domain in a few minutes and a few lines of code.
You might need HTTPS for your website. There are many ways to add HTTPS for your web server. In this article, I will go over how to attach HTTPS for your simple EC2 web server using AWS services. It only requires a few more clicks.
Prerequisites
- You already have an AWS account
- You have an EC2 instance and an Elastic IP is associated with it
- Your domain is managed in Amazon Route 53
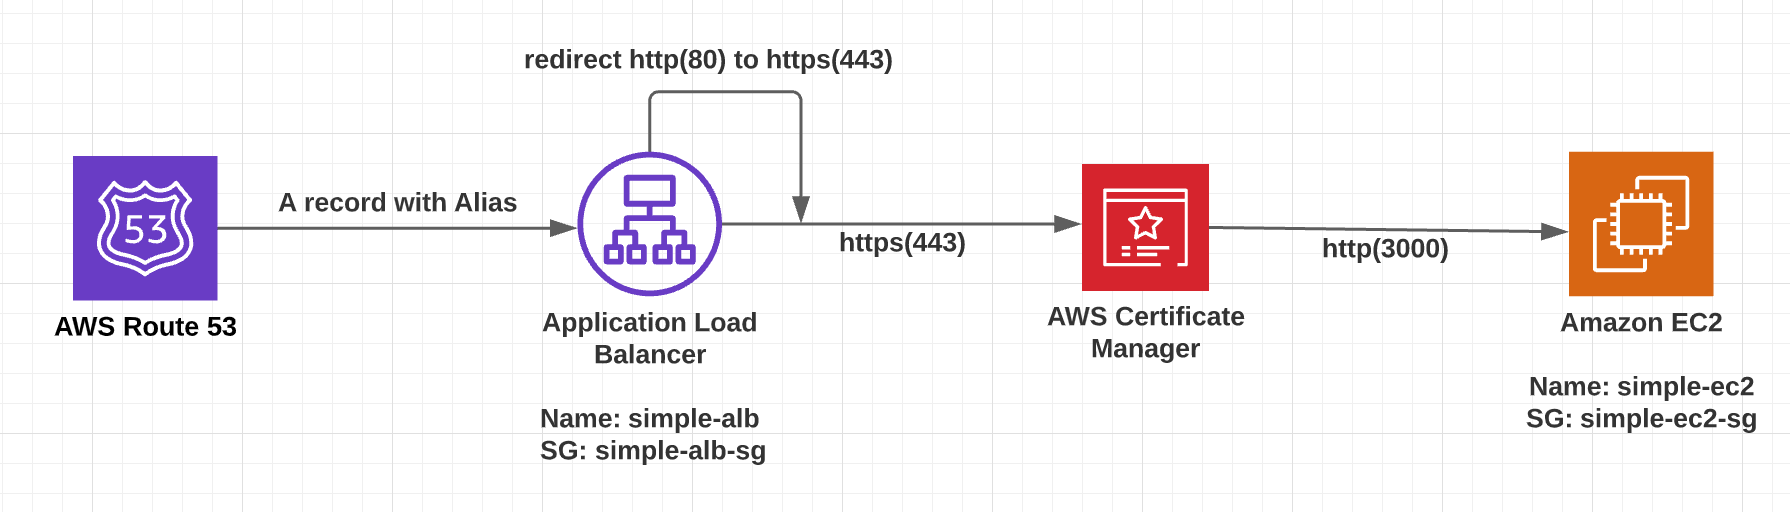
Overall Architecture
Application Load Balancer (ALB) can associate with AWS Certificate Manager. Then the ALB connects the Route 53 and EC2 Web Server.
Step 1: Simple Web Server
SSH into your EC2 instance. Here I assume that your EC2 instance has node.js and express-generator installed. If not, enter the following commands.
curl -o- https://raw.githubusercontent.com/nvm-sh/nvm/v0.34.0/install.sh | bash
. ~/.nvm/nvm.sh
nvm install node
npm install express-generator -g
With the following command, you can run a very simple web server at port 3000.
express simpler-server
cd simple-server
npm install
npm start
The public IP address for the EC2 is 52.78.99.169. You can enter the IP address followed by :3000 in the web browser address bar to ensure the web server you just launched works fine. (If you get a timeout, then it is likely that the security group is not allowing the port 3000)

Step 2: Connecting Domain (No HTTPS Yet)
Let’s say, I have a domain mulchi.co. And I want to connect my web server to be accessed via http://simple.mulchi.co.
Go to Route 53 in the AWS console. Choose your domain then click Create record. I created an A record: The record name is simple.mulchi.co and the value is my EC2 public IP address.

After a few seconds, your EC2 web server can be accessed via your domain, in my case it is http://simple.mulchi.co:3000. Note that https://simple.mulchi.co:3000 is not working and Chrome Browser considers our server as Not Secure.

Step 3: AWS Certificate Manager
To enable HTTPS we need an SSL certificate for our domain. Go to AWS Certificate Manager in AWS Console. You can easily get the certificate for your subdomain for free.
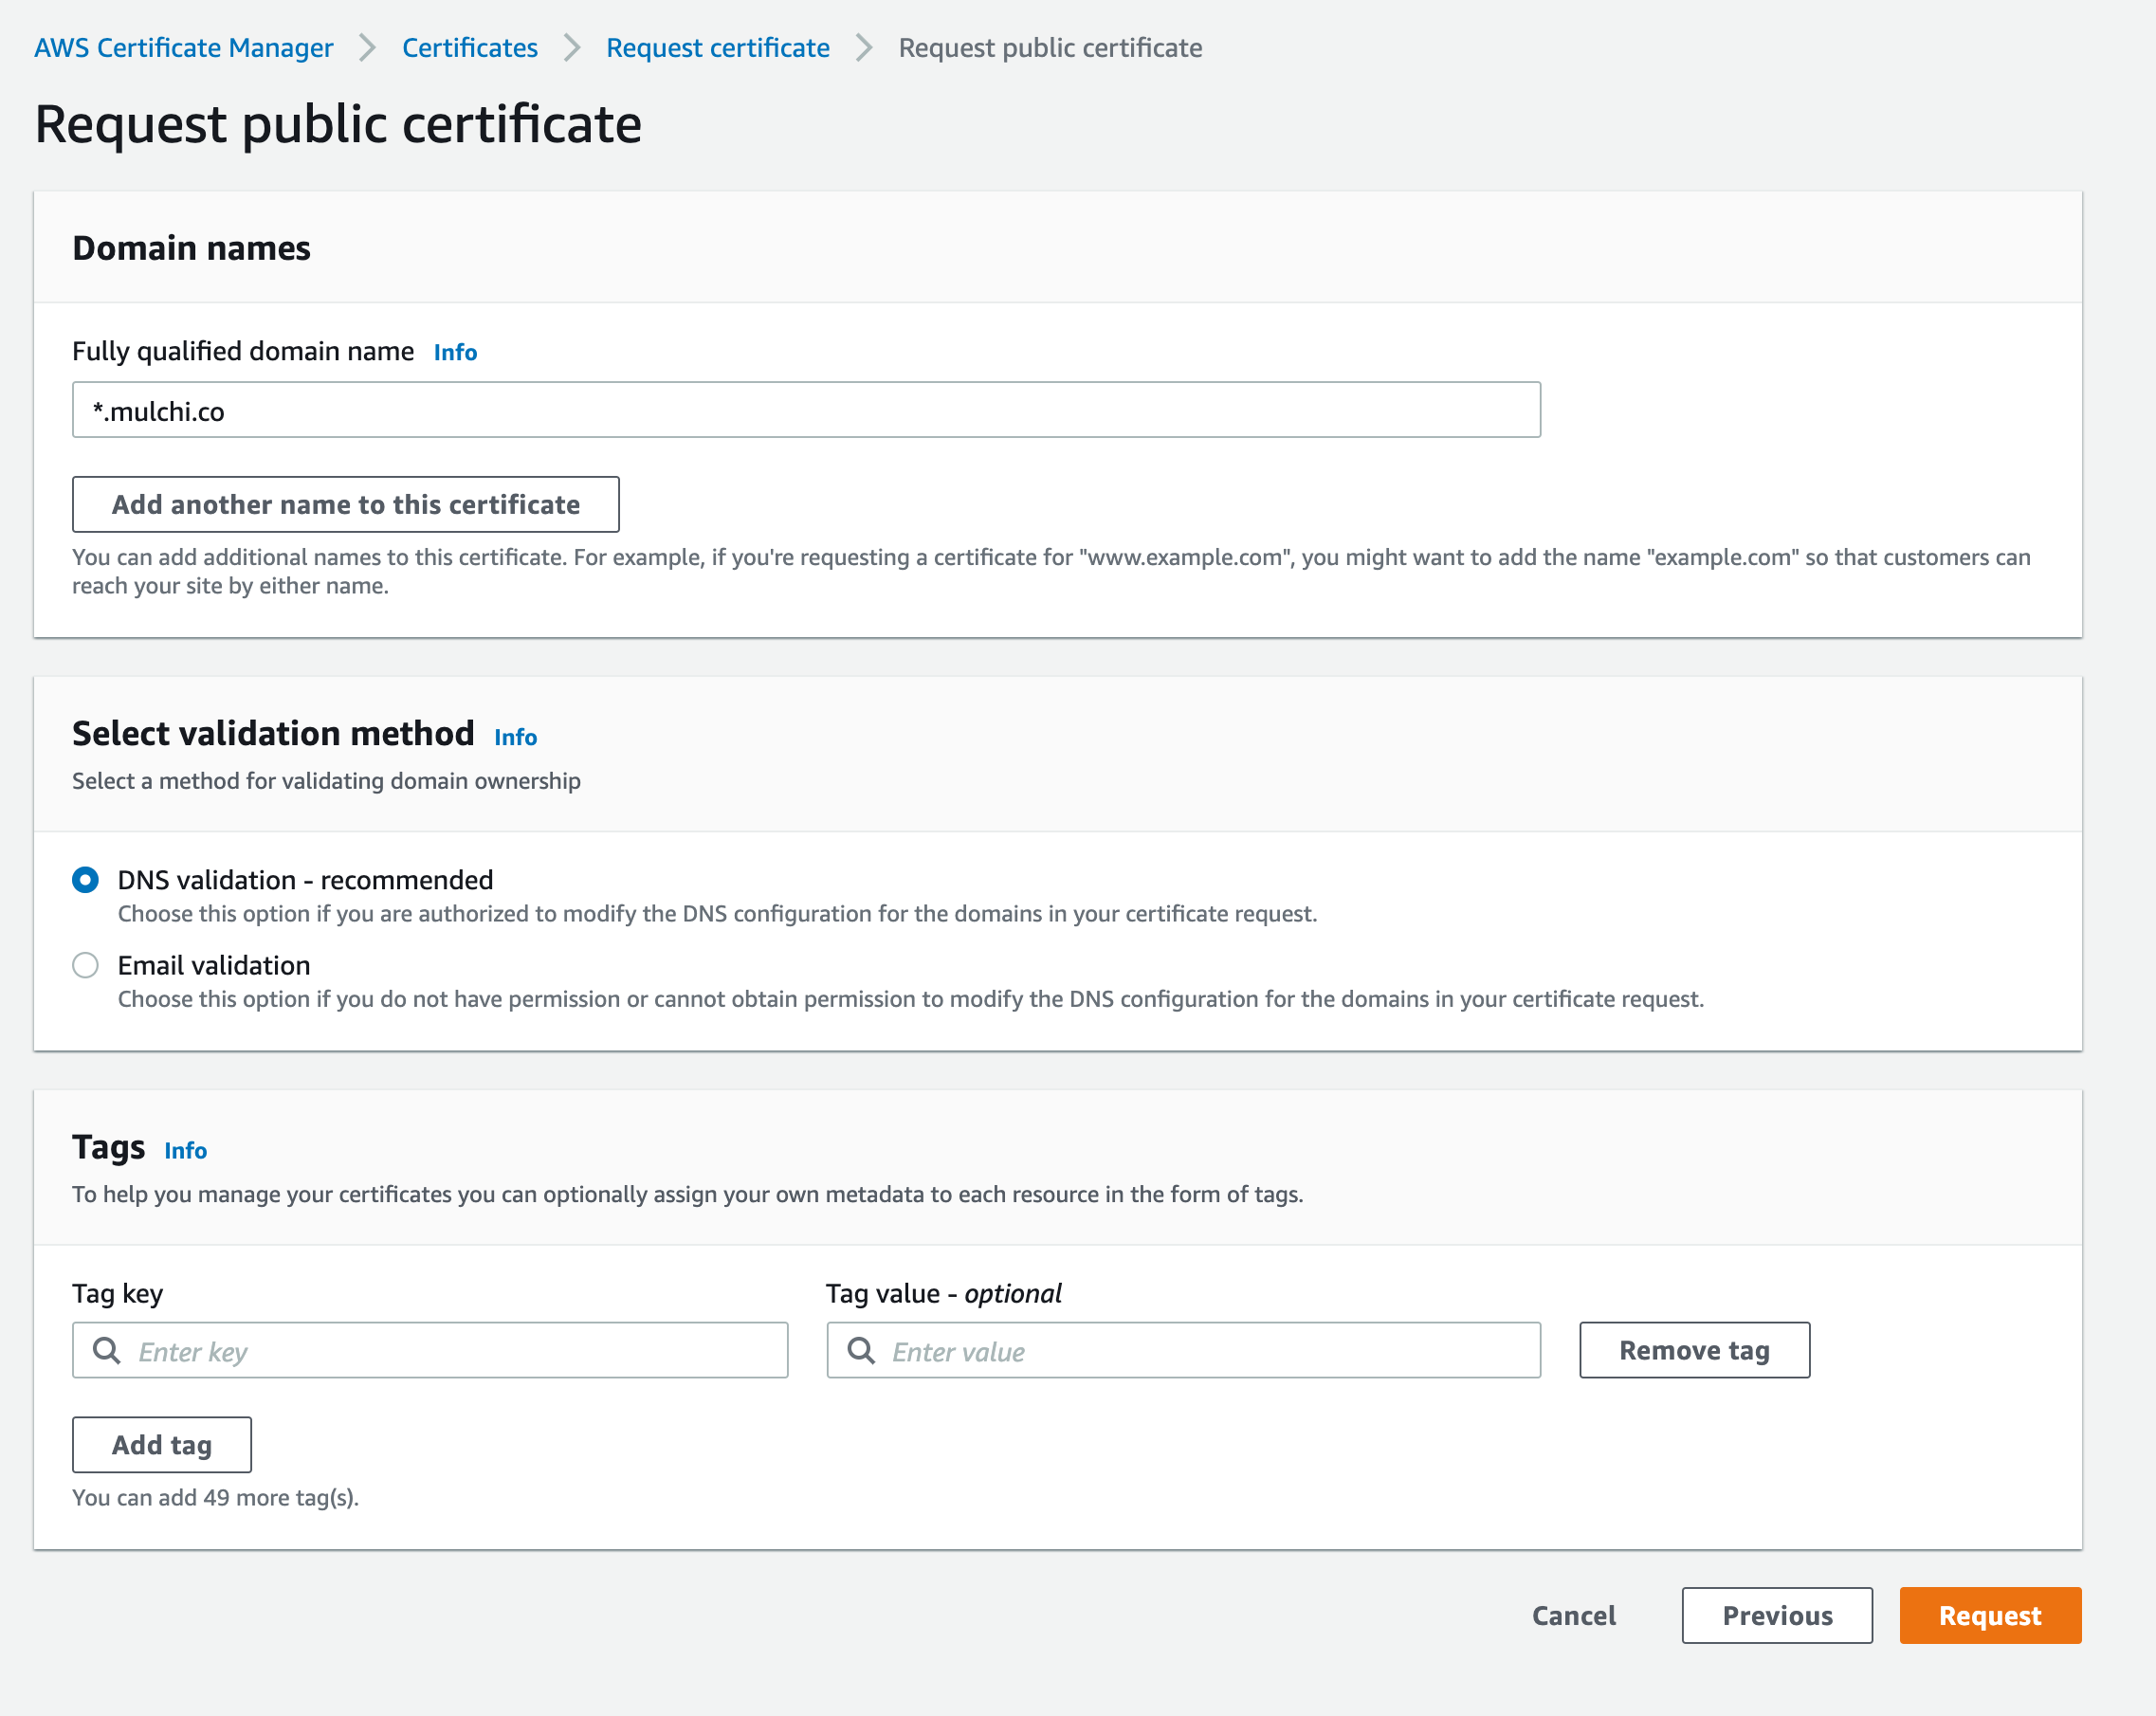
We will associate that certificate with an ALB.
Step 4: Application Load Balancer
Our final component to create is Application Load Balancer (ALB). Go to EC2 -> Load Balancers -> Create Load Balancer
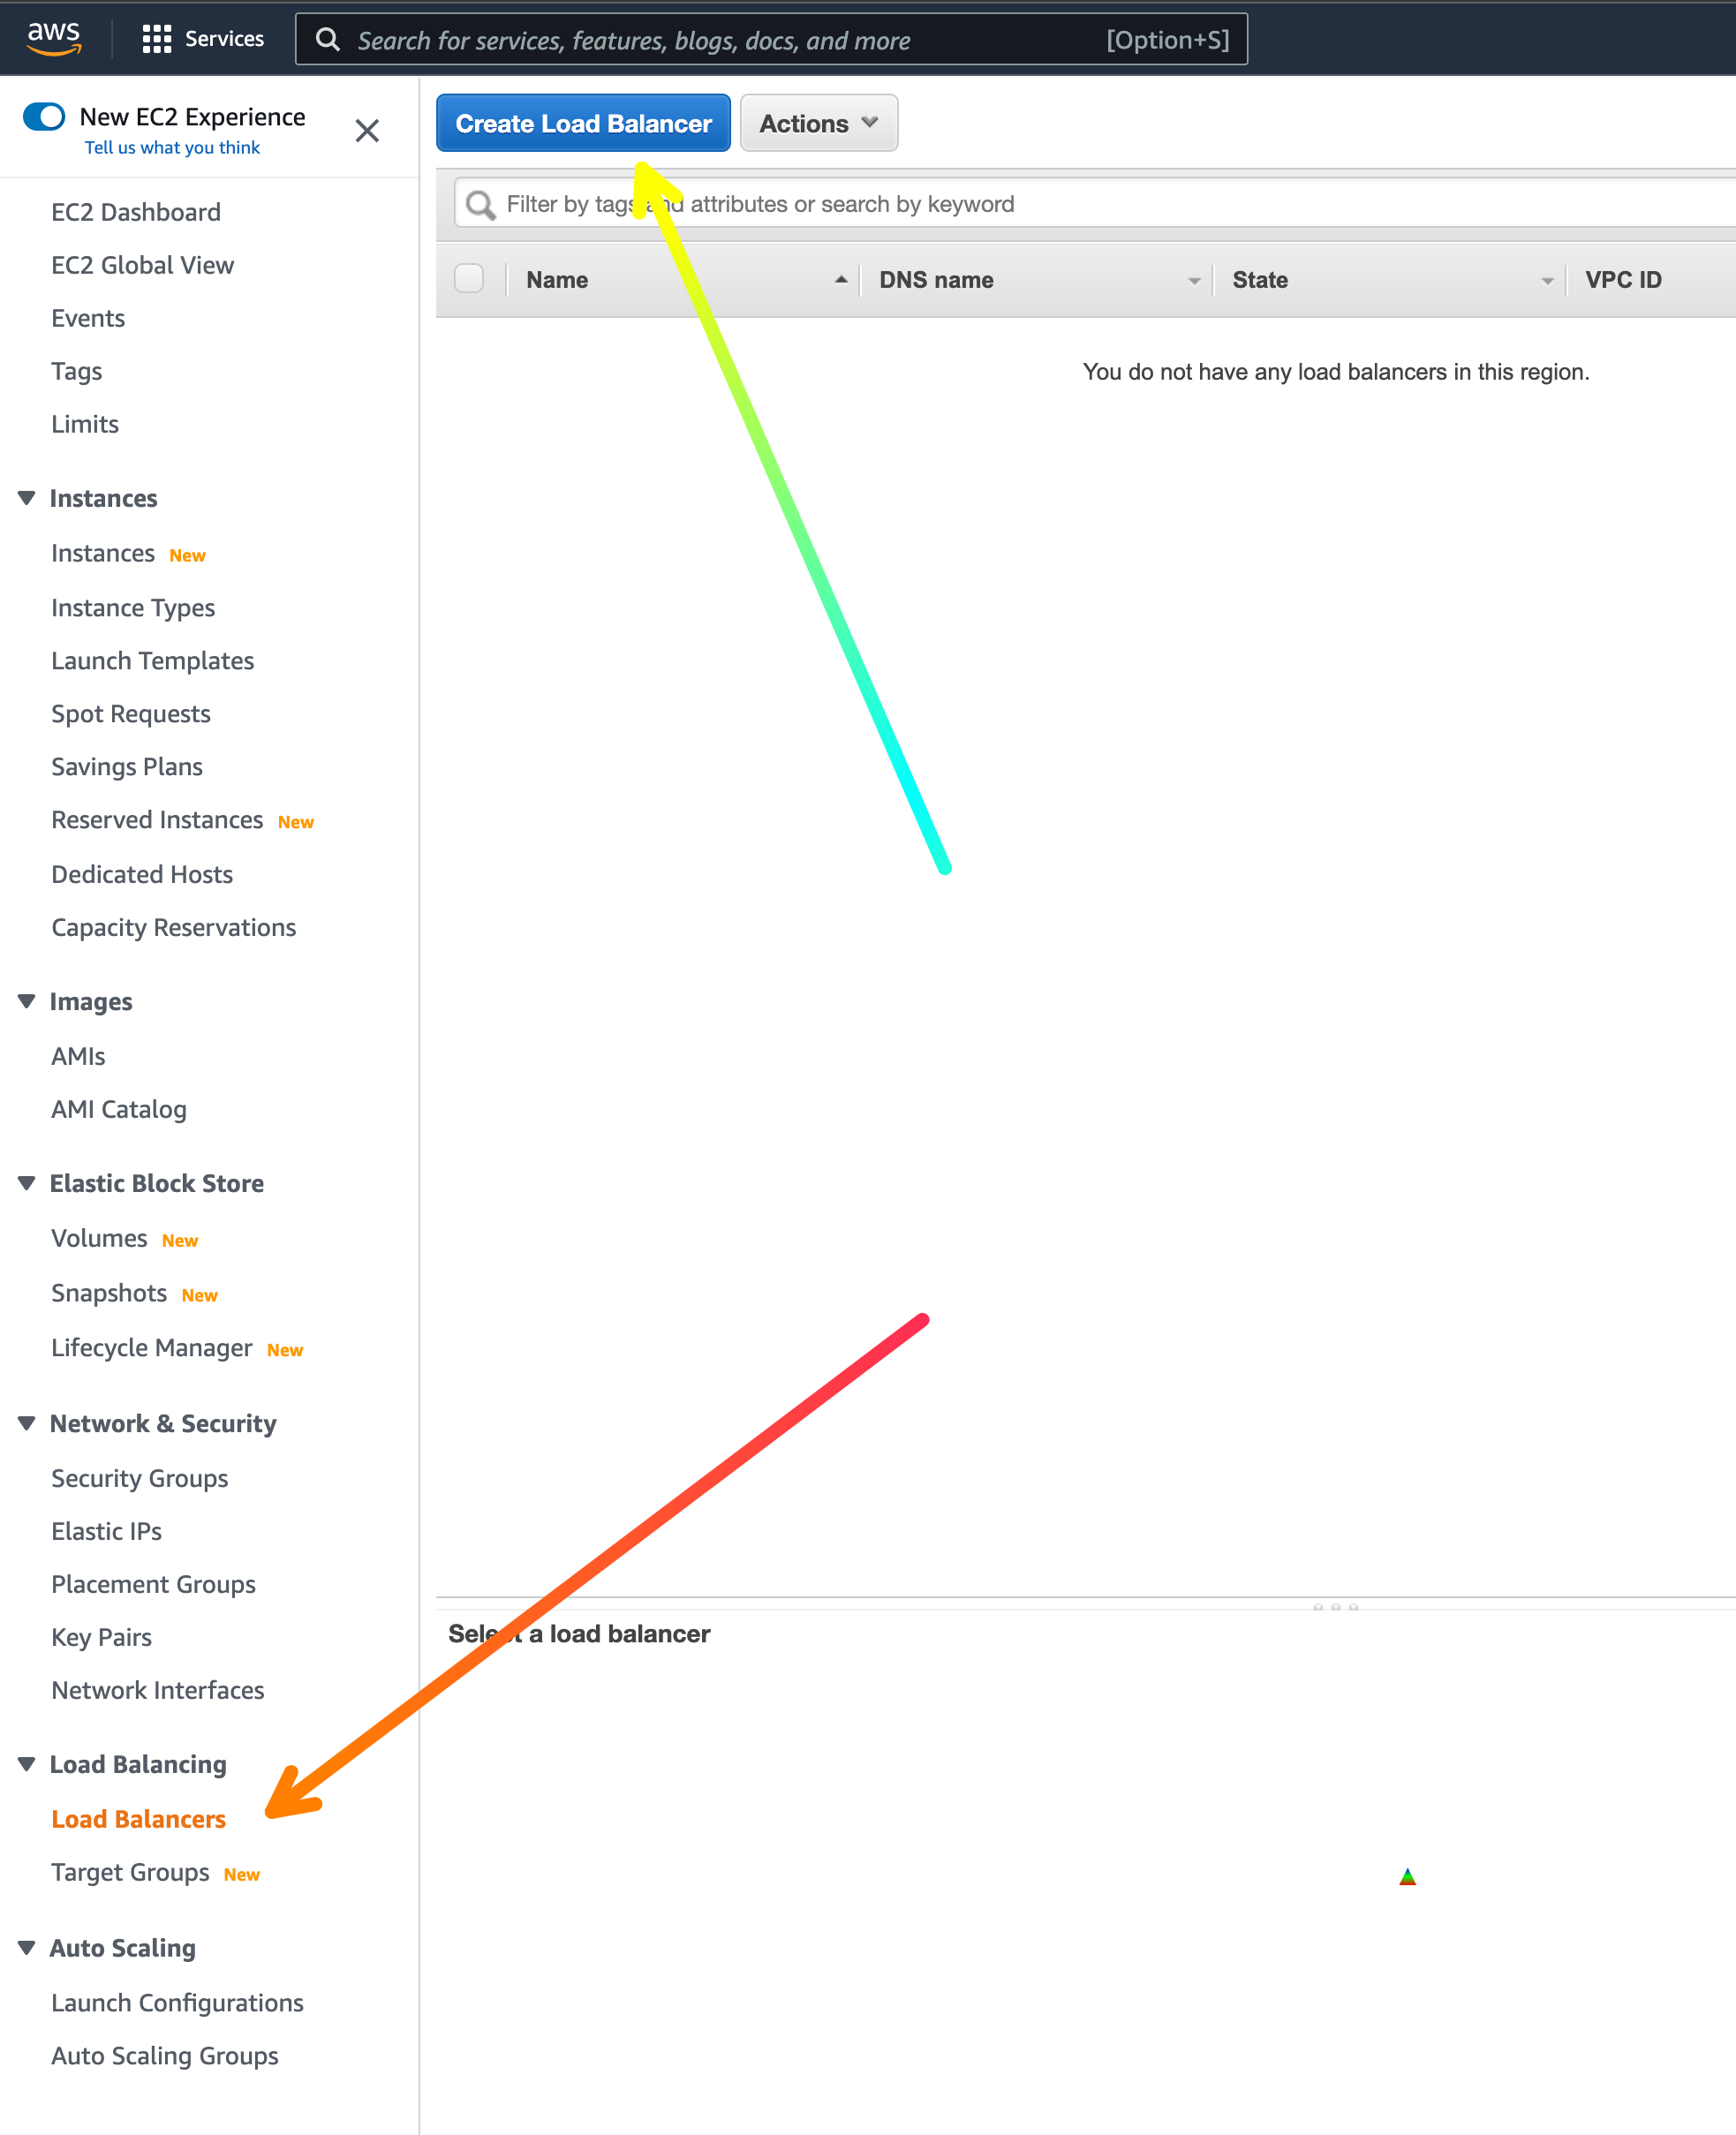
- Choose Application Load Balancer
- Set Load balancer name
- Scheme as Internet-facing
- Set VPC and subnet

- Create a new security group that allows HTTP and HTTPS inbound traffics.

- Choose the security group you just created.
-
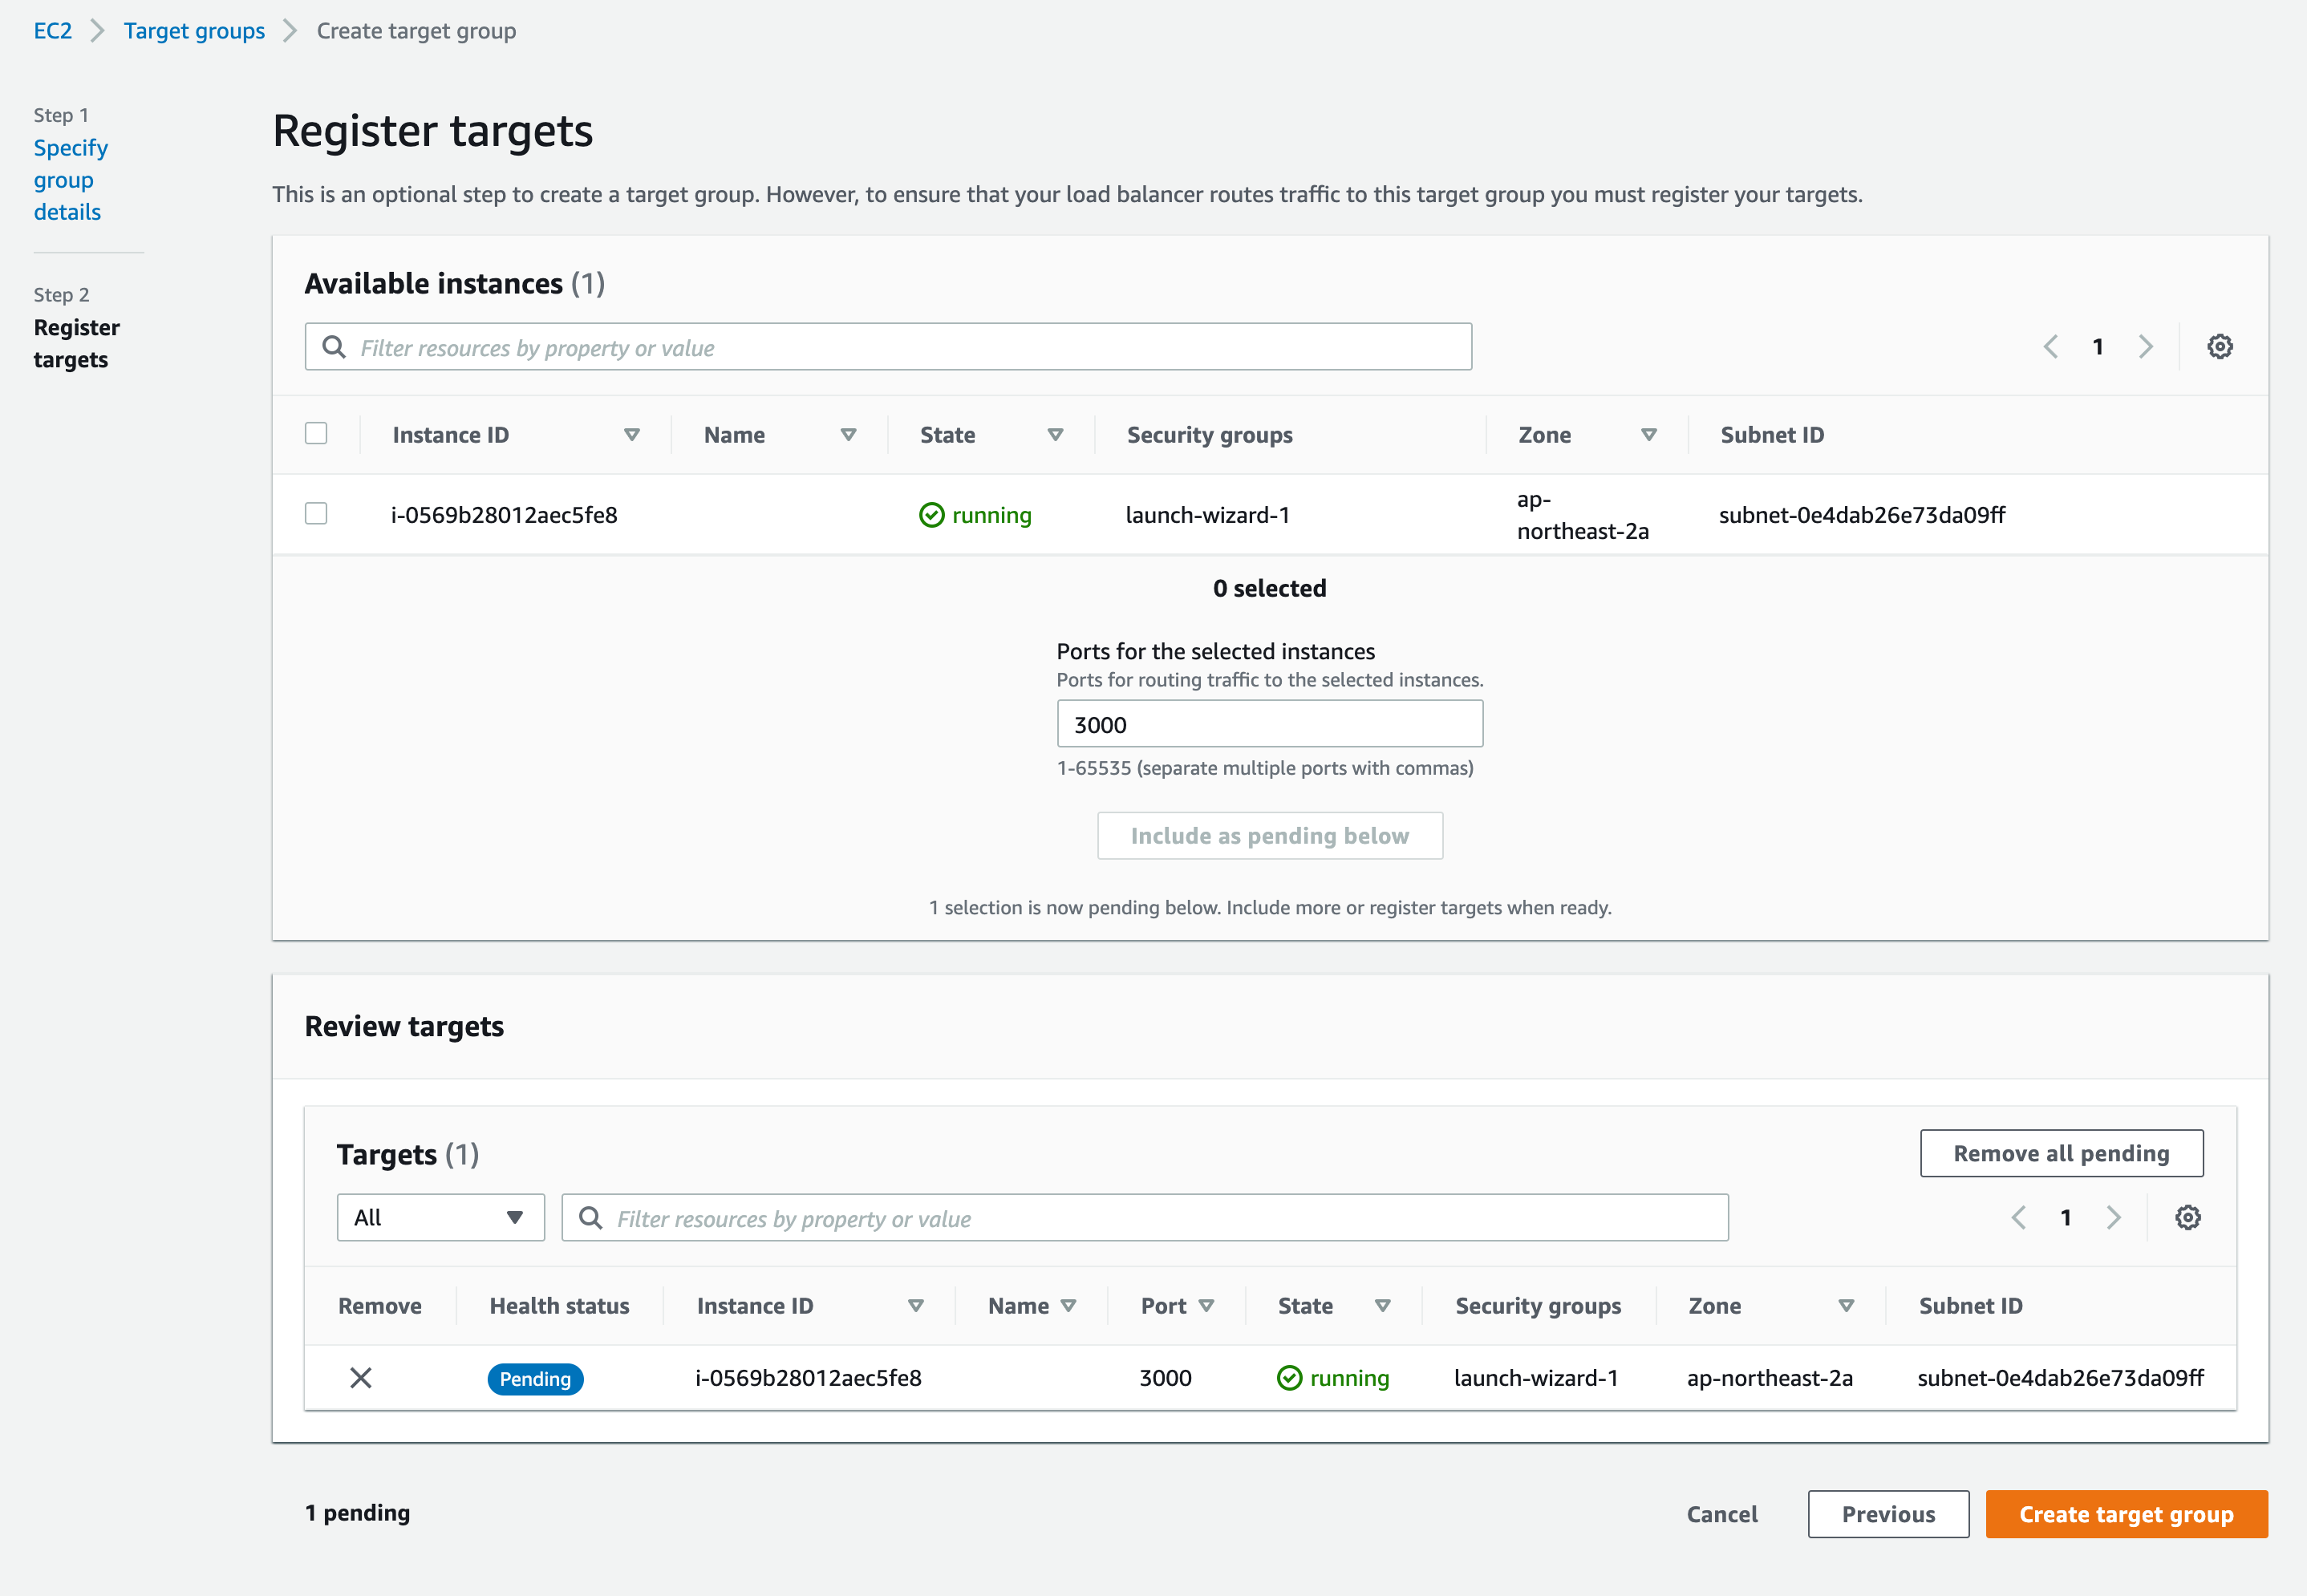
Create a target group.
- Choose Instances for the type
- Set a target group name
- Allow protocol HTTP and port 3000
- Select your web server EC2 instance then click Include as pending below button
- Click Create target group
- Change Listener Protocol as HTTPS and select the target group you created
- Choose the SSL certificate you created in Step 3.
- Click Create load balancer

Once the ALB is created, you need to adjust Listeners setting.
- Choose the ALB you created then go to Listeners tab.
- Click Add listener
Step 5: Adjust Route 53
Go back to Route 53 in the AWS console and choose the subdomain. Now it should be pointing to the ALB instead of an EC2 IP address.

Step 6: Adjust Security Group for EC2
Now you only want the traffics coming from the ALB. You do not want any http://52.78.99.169:3000 kind of access.
Let’s create a new security group for the EC2 web server.
- Go to EC2 -> Security Groups -> Create a security group
- In Inbound rules section, you choose the ALB’s security group

Associate the security group you just created with EC2
- Go to EC2 -> choose the EC2 -> Actions -> Security -> Change security groups

Change the Inbound rules. Remove the old security group and select a new EC2 security group. EC2 is now accepting traffics only from the ALB.

Finally, the Chrome browser treat our web server as safe!

Conclusion
Usually, to achieve HTTPS, you need to install an SSL certificate in your EC2 server as well as Nginx. However, as long as you stick with Route 53 and ALB, you can not only use HTTPS but also redirect HTTP traffics to HTTPS without installing a certificate or add complicated configuration files.
Thanks to AWS. :)